This is an old revision of the document!
Table of Contents
Useful commands - linux / ubuntu
[file] Show file type
file file.txt
[tree] Show tree of files
tree -F -L 1 /
-F - show file type
-L - level (how nested should be), 1 - show only files under first directory level.
[ln] Symbolic link
ln -s lab02/.Hulk hulk
This will create file hulk as a shortcut for the (original) file lab02/.Hulk
[tar] Create a tar archive
tar -cvf archive.tar decrypted_file.txt encrypted_file.enc dir2
c - create
v - verbose
f - file name of the archive
[tar] Add a new file to the tar archive
tar -uf documente.tar raport_nou.txt
tar -rf documente.tar raport_nou.txt
-u - update
-r - add (does not check if the file is newer)
[tar] View tar archive content
tar -tf archive.tar
t - table (view archive content as a 'table')
f - file name (archive name)
[tar] Extract tar content
tar -xvf archive.tar
x - extract
v - verbose
f - file
[tar] Create a tar.gz archive
tar -czvf archive.tar.gz decrypted_file.txt encrypted_file.enc dir2
z - compressed gzip
c - create
v - verbose
f - file name of the archive
[gunzip] Add a file to existing tar.gz archive
This cannot be done directly using tar tool, but we will use gunzip to extract the tar archive, add a new file to it and then gzip it again.
gunzip archive.tar.gz && tar -rf archive.tar newfile.txt && gzip archive.tar
[tar] View tar.gz archive content
tar -tzf archive.tar.gz
t - table (view archive content as a 'table')
z - compressed gzip
f - file name (archive name)
[tar] Extract tar.gz content
tar -xzvf archive.tar.gz
x - extract
v - verbose
f - file
[zip] Create a zip archive
zip archive.zip file1.txt file2.txt
[zip] Add a new file to the zip archive
zip -u archive.zip new_file
-u - update (or add if not already in the archive)
[zip] View zip archive contents
zip -sf archive.zip
zip --show-files archive.zip
[zip] Extract a zip archive
unzip archive.zip -d dir
-d - optional destination directory, if missing the current directory will be used.
Find a file / directory
[find] Find all txt files in the users home directory
find ~ -name "*.txt"
[find] Find insensitive
sudo find / -iname "*ssh*conf"
[find] Find all files > 100 MB
find ~ -type f -size +100M
[find] Find and remove all files in /tmp directory
find /tmp -type f -name "*.tmp" -exec rm {} \;
{} - placeholder for each file, it will contain the full path name
\; - marks the end of the command
[find] Find executable files
find . -type f -executable
[find] Find all empty directories (and subdirectories)
find . -type d -empty
[find] Find all files that contain at least one digit (number) from a directory
Locate a file (searching in database instead of actual files on disk)
[locate] Installing the locate tool
sudo apt install mlocate
sudo updatedb
[locate] Locate a file
locate "*ssh*conf"
[locate] Locate a file insensitive
locate -i "Example.txt"
[locate] Locate only the first 10 results
locate example.txt | head -10
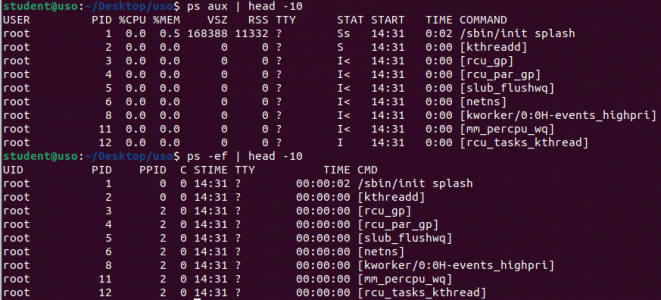
[ps] List all active processes
ps -ef
e - 'every' - we want to see every process
f - 'full' - get full details
ps aux
a - all users
u - user oriented format output (display user who owns the process, CPU, memory, etc.)
x - also includes the processes that are not attached to a terminal.
[ps] List all processes of a certain user
ps -u username
[ps] List details of a specific process
Change 2638 with the actual process pid.
ps -p 2638
[ps] List processes based on cpu usage
ps -aux --sort=-%cpu
[ps] List processes based on memory usage
ps -aux --sort=-%mem
[ps] List processes with custom columns
ps -e -ouser,uid,pid,%mem,%cpu,rss,cmd --sort=%mem
[ps] List processes - descending sorting
Just add a - in the –sort.
ps -e -ouser,uid,pid,%mem,%cpu,rss,cmd --sort=-%mem | less
[ps] Search for a specific process
Replace gnome with your keyword.
ps -ef | grep gnome
[pstree] List the process tree
pstree
pstree -u
pstree -p
u - show users p - show pid
Get the pid of a process
Multiple methods:
pgrep nginx
ps aux | grep nginx | grep -v grep
pidof nginx
[apt] APT commands
sudo apt install nginx
sudo apt search nginx
sudo apt remove nginx
sudo apt purge nginx
sudo apt update
sudo apt upgrade
[ip] Check if a network card is active
sudo ip link show
[ip] Start a network interface
ip link set dev eth1 up
[ip] View IPs on all network interfaces
sudo ip address show
[ip] Remove a network configuration from an interface
sudo ip address flush eth1
[ping] Check if a station is alive
ping -c 4 10.125.50.50
c - number of packets to send (by default in infinite)
[ip] Show routing table / find default gateway
[ip] [nmcli] Find DNS Servers
nmcli dev show | grep DNS
resolvectl status | grep 'Current DNS'
To print only IPs:
nmcli dev show | grep DNS | cut -d ':' -f2 | tr -d ' '
[ip] [host] Get the IP address of a host / Check if DNS service is working
Update DNS Servers
Change the /etc/resolv.conf: nameserver 8.8.8.8 nameserver 8.8.4.4
[netstat] Display open UDP ports
sudo netstat -ulpn
u - udp ports only
l - listening state ports only
p - program name / PID that has opened the port
n - shows the actual IP address on which the system is listening for connections, instead of resolving the host name.
sudo ss -ulpn
[netstat] Display open TCP ports
sudo netstat -tlpn
t - TCP
sudo ss -tlpn
[netstat] Display both TCP and UPD ports
sudo netstat -tulpn
t - TCP
u - UDP
sudo ss -tulpn
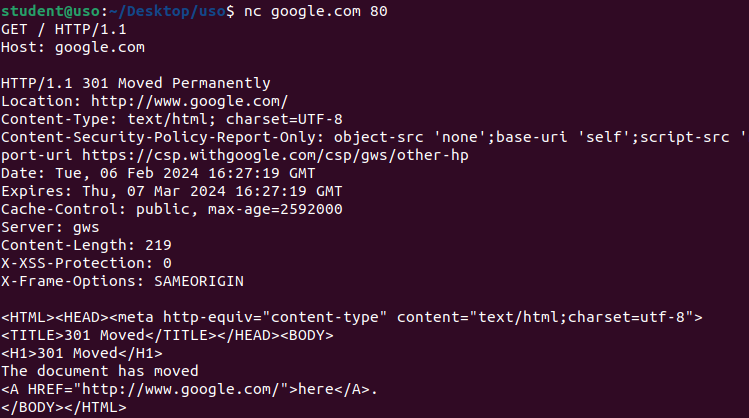
[nc] Establish a TCP communication with an application - Netcat
[wget] Download a single file from a HTTP(s) / FTP server
wget elf.cs.pub.ro
Download in background with a custom file name:
wget -b -O google.html http://google.com
b - run in background
O - output file name.
[curl] Show only HTTP Header of a site
curl -I -L http://ocw.cs.pub.ro
I (or –head) - send only HTTP HEAD request instead of HTTP GET
L - follow any redirectrion.
[ssh] Connect to a SSH server
ssh user@192.168.1.8
[ssh] Connect to a SSH server and run a command
ssh root@10.10.10.3 ip address show
[scp] Send / copy a file to a remote machine
scp /home/file.txt student@10.10.10.3:~/
[scp] Receive / download a file from a remote machine
scp student@10.10.10.3:/home/file.txt ~/
[scp] Send / copy a directory to a remote machine
scp -r /home/dir student@10.10.10.3:~/
[scp] Receive / download a file from a remote machine
scp -r student@10.10.10.3:/home/dir ~/
[ssh][public key] SSH Public Key authentication
ssh-keygen -t rsa -b 4096
ssh-copy-id root@10.10.10.3
What was generated:
- ~/.ssh/id_rsa –> private key
- ~/.ssh/id_rsa.pub –> public key
[ls] Escaping globbing patterns / special characters
Just enclose the string in “”
ls support-globbing/"[HOME]"*
find . -name "*search*"
Get memory information
Get CPU information
cat /proc/cpuinfo
[grep] Search for a string in a file
cat workspace/C/searching/binary_search.c | grep search
grep search workspace/C/searching/binary_search.c
grep 'error' log.txt
[grep] Case insensitive search for a string in a file
grep -i 'string_to_search' file.txt
[grep] Count number of lines of searched string in file
grep -c 'cache' /proc/cpuinfo
[grep] Count number of occurrences (not just lines) of searched string in file
grep -o 'searched_string' file.txt | wc -l
o - print each occurrence on a separate line l (from wc) - count lines
[grep] Recursive search for a string in a directory
grep -r 'cache' /proc 2>/dev/null
2>/dev/null - don't show errors
[grep] Recursive (and insensitive with line number displayed) search for a string in a directory
grep -nri search workspace/C/ | less
n - show line number r - recursive i - case insensitive
[grep] Recursive search for a word in a directory
grep -nri -w "search" workspace/C/ | less
[grep] Display lines that does NOT contain the searched string
Show all lines that does not contain error string:
grep -v 'error' log.txt
[grep] Display lines that starts with a certain string
Search for lines that starts with error string:
grep '^error' log.txt
[grep] Display a certain number of lines AFTER matching a string in a file
Displays each line that contains error, followed by 3 lines:
grep -A 3 'error' log.txt
[grep] Display a certain number of lines BEFORE matching a string in a file
Displays two lines before each line that contains error:
grep -B 2 'error' log.txt
[grep] Display a certain number of lines BEFORE and AFTER matching a string in a file
Displays two lines before and after each line that contains error:
grep -C 2 'error' log.txt
[grep] Search in a file for one string OR another using ERE (Extended Regular Expressions)
grep -E -i "error(s)?|warning(s)?" example.txt
E - extended regular expression
i - case insensitive
error(s) - search for strings that contains error or errors
| - or
warning(s) - search for string that contains warning or warnings
? - makes that previous element (s) to be optional.
[grep] Search in a file for an exact match of string OR another using ERE (Extended Regular Expressions)
grep -E -i "\berror(s)?|warning(s)?\b" example.txt
\b - the match will be made at the start and at the end of a word.
[grep] Add an alias - go for xdg-open
Instead of running xdg-open https://google.com, we want to use go https://google.com.
For this we need to define an alias in ~/.bash_aliases (this is read from ~/.bashrc).
So we need to append line: alias go='xdg-open'
grep -qxF 'alias go='\''xdg-open'\''' ~/.bash_aliases || echo 'alias go='\''xdg-open'\''' >> ~/.bash_aliases
|| - the command after this OR operator will be executed if the command before it fails.
q - run in silent mode, without printing anything
x - search on the ENTIRE line
F - disable regular expression, the string is a simple text.
>> - append to the end.
Next, reload the ~/.bashrc file:
source ~/.bashrc
[;] Execute multiple commands in the same line, one by one
mkdir demo; cd demo; touch Hello; ls
[&&] Execute a command on the same line if the PREVIOUS one SUCCEEDED
mkdir operators/demo && cd operators/demo
[||] Execute a command on the same line if the PREVIOUS one FAILED
ls -d operators || mkdir operators
[find] Print info about files in the current directory using FIND with -exec
find . -maxdepth 1 -type f -exec ls -l {} \;
[find] Print info about files in the current directory using FIND and PIPE
find . -maxdepth 1 -type f -print0 | xargs -0 ls -l
-print0 - finish each string found with a null character instead of newline. This helps in manipulating files that contains spaces or newlines.
0 - treat received input as a list of args separated by the null character - used to correctly processed the output of print0.
[find] Find all files from /lib that does not start with the lib prefix
find -L /lib -type f -not -name 'lib*.*'
L - follow symlinks (this is necessary because lib is a symlink for usr/lib)
not - negate the name
[xargs] Move all files (requiring confirmation) with a certain extension from the current folder to parent
ls *.c | xargs -I {} -p mv {} ..
I {} - placeholder / replacer for each character
p - requires user confirmation
Safer version (handles better the files with spaces):
find . -maxdepth 1 -type f -name "*.c" -exec mv {} .. \;
[1> 2>] Redirect STDOUT and STDERR
Redirect both in firefox-ignore file.
firefox &> firefox-ignore
Another way:
firefox > firefox-ignore 2>&1
To redirect input in a file and output to another file:
firefox > firefox-output.txt 2> firefox-error.txt
OR
firefox 1> firefox-output.txt 2> firefox-error.txt
> is equivalent to 1>
[dd] Generate 100 MB file with null values
dd if=/dev/zero of=null-100mb count=100 bs=1M
if=/dev/zero - input file will get data from /dev/zero
of=null-100mb - name of the output file
count=100 - number of blocks that will be copied
bs=1M - size of each block
[dd] Generate 100 MB file with random values
dd if=/dev/urandom of=rand-100mb count=100 bs=1M
[grep] Simple Regular Expressions Examples
Search for lines that starts with Hello:
grep '^Hello' message.txt
Search for lines that ends with ending:
grep 'ending$' message.txt
Search any lines that contains e followed by any character and then r:
grep 'e.r' message.txt
Search lines that contains sc followed by h or y and the o:
grep 'sc[hy]o' wordlist.txt
Search lines that contains sc followed any character except h or y and the o:
grep 'sc[^hy]o' wordlist.txt
Lines with the character o at least once:
grep -E 'o+' wordlist.txt
This means o with zero or more apparitions. So it will match everything:
grep -E 'o*' wordlist.txt
Search for one or another
grep 'succes|error' mesaje.txt
[grep] List lines that starts with a certain letter
[grep] List students with any secondary name that starts with F
grep '[ -]F[a-z]\+[^\.]' students.txt
[ -]F - space or - followed by F
[a-z]\+ - any a-z characters at least once. In standard grep (not extended) + should be prefixed with \
[^\.] - following character is not .
[ls] List files with .txt extension and a single character before extension
[ls] List all files that starts with a, b or c and have the .txt extension
ls [abc]*.txt
[abc] - characters a, b or c * - any number of characters (including 0) .txt - ends with txt
[grep] List students with their father initial followed optionally by . in their name
grep -E ' [A-Z]\.? ' students.txt
\.? - optional dot
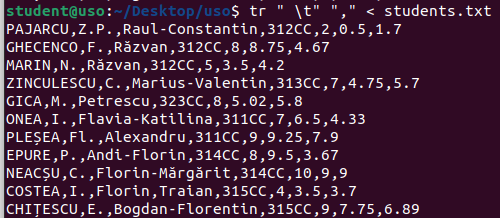
[tr] Convert spaces and tabs to comma
cat students.txt | tr " " "," | tr "\t" ","
OR
cat students.txt | tr " \t" ","
OR (much more cleaner)
tr " \t" "," < students.txt
[tr] Convert lowercase string to uppercase
[tr] Delete characters from a to e
[tr] Squeeze repetition of characters
[sed] Replace entire text
echo "hello world" | sed 's/world/universe/'
[sed] Replace first occurrence
[sed] Replace all occurrences
echo "apa de apa" | sed 's/apa/apa minerala/g'
g - substitution will be applied globally (for all occurrences on that line)
[sed] Delete lines
[sed] Insert text after a match
[sed] Edit the file in place
Replaces all occurrences of “old” with “new” in file.txt directly, modifying the file in place.
Use with caution and ideally with a backup.
sed -i 's/old/new/g' file.txt
i - in place
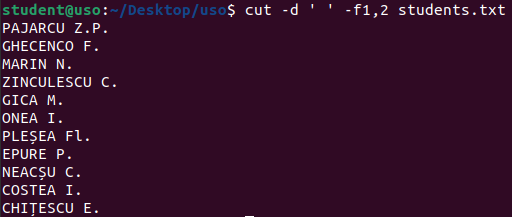
[cut] Print the first two columns (separated by space) from a file
cut -d ' ' -f1,2 students.txt
-d ' ' - delimiter is space
-f1,2 - column numbers to extract (starts with index 1)
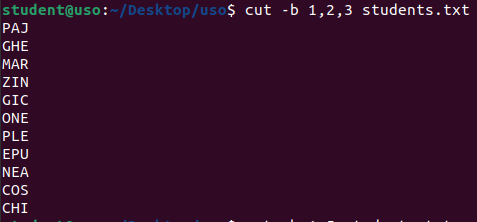
[cut] List only the first bytes from each line
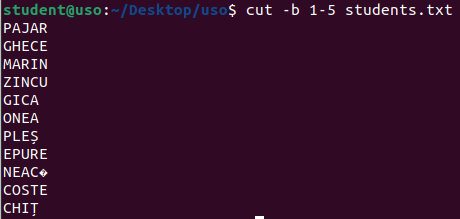
[cut] List only specific characters from each line
[awk] Extract column using a custom separator
awk -F: '{print $1}' /etc/passwd
F - field separator
[awk] Use multiple delimiters to extract columns from a file
Another way to set delimiter is in the BEGIN block.
awk 'BEGIN{FS="[ \t]+"} {print $1}' students.txt
BEGIN - special block used to adjust the initial settings before executing awk.
FS - field separator.
[ \t]+ - one or more spaces or tabs.
$1 - first column
[awk] Skip first two lines
w | awk 'FNR>2 {print $1}'
FNR - file number record (internal awk variable holding current line number).
[awk] Skip first column - print just other columns not the first one
history | awk '{$1=""; print $0}'
{$1=""} - sets the first column (represented by $1) to an empty string, effectively removing it from the output. \\
print $0 - prints the entire line to the output.
[awk] Skip first two columns
history | awk '{$1=""; $2=""; print $0}'
[awk] Add a header to the output and display the entire file content
[awk] Add a header and a footer to the output and display the entire file content
awk 'BEGIN {print "The File Contents:"} {print $0} END {print "This is the end my friends."}' students.txt
[awk] Display first word (string followed by a space) from each line of a file
Default column separator is any whitespace (space, tab) and newline.
awk '{print $1}' students.txt
$1 - first column
[awk] Display last word (string followed by a space) from each line of a file
[awk] Display entire line and change some column values
[awk] List students with notes greater than 5
[awk] Compute the average of final grades
awk '{sum += $5} END {print "Average of final grades:", sum/NR}' students.txt
sum - custom variable to count the sum (it is not predefined).
$5 - fifth column.
END - block which will be executed after all lines from the file were processed.
NR - internal awk variable which stores the total number of lines.
[awk] Customize the columns output
Print - between the first and second column:
awk '{print $1, "-", $2}' students.txt
[awk] Multiply column value based on a condition
[awk] Print only lines 5 and 7 from /etc/passwd
[seq] Generate a sequence of numbers from 1 to 5
[seq] Generate a sequence of numbers from 1 to 10, with an increment of 2
[seq] Generate a sequence of numbers from 0.5 to 2.5, with an increment of 0.5
[seq] Generates numbers with two decimal places
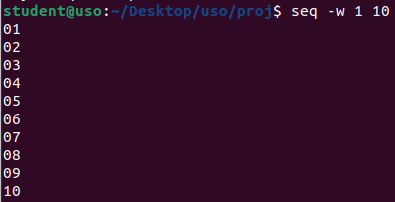
[seq] Generate numbers with equal width (added 0 in front)
[sort] Sort numbers ascending order
echo -e "5\n3\n8\n1" | sort -n
e - interpret escape sequences n - numbers (sort as numbers)
[sort] Sort numbers descending order
[sort] Sort by a certain column
Sort numerically by second column.
echo -e "a 2\nc 1\nb 3" | sort -n -k2
k2 - sort by second column
Sort lexicographically by first column.
(k1 can be omitted here, sort will automatically sort lexicographically by the first column.)
echo -e "a 2\nc 1\nb 3" | sort -k1
[sort] Sort by multiple columns
cat multiple.txt | sort -k1,1 -k2,2gr
k1,1 - sort entire first column
k2,2 - sort entire second column
g - general numeric sort (sort better different kind of numbers for ex 2, 2.5, 3.55)
r - reverse
[sort] Unique sort - sort and remove duplicates
[sort] Sorting with a specific separator
Default separator is tab (\t). We want to change it to :.
echo -e "a:2\nb:1\nc:3" | sort -t: -k2
t - change separator
[sort] Check if the column is sorted (without sorting it, just check)
[uniq] Remove duplicated lines
[uniq] Remove duplicated lines and count occurences
[uniq] Show only lines that appear multiple times
[uniq] Show only not duplicated lines
[sort] [uniq] [awk] Most used 10 history commands
history | awk '{$1=""; print $0}' | sort | uniq -c | sort -nr -k1 | head -10 | awk '{$1=""; print $0}'
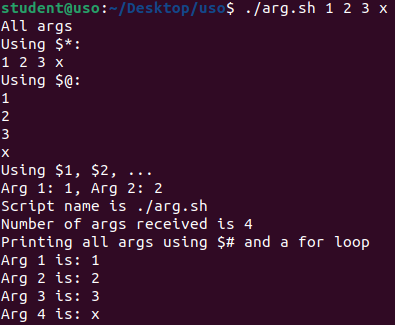
[bash] All types of arguments in a bash script
- arg.sh
#!/bin/bash

echo "All args"

echo "Using \$*:"
for arg in "$*"; do
    echo "$arg"
done

echo "Using \$@:"
for arg in "$@"; do
    echo "$arg"
done

echo "Using \$1, \$2, ..."
echo "Arg 1: $1", "Arg 2: $2"

echo "Script name is $0"

echo "Number of args received is $#"

echo "Printing all args using \$# and a for loop"

nr_args=$#

for (( i=1; i<=$nr_args; i++ ))
do
	eval arg=\${$i}
	echo "Arg $i is: $arg"
done
[bash] $var vs ${var}
[bash] Get the length (number of characters) of a variable
[bash] Extract a substring from a variable
[bash] Command substitution - $() structure
Execute a command based on the condition of another command:
if [[ $(grep -c "searched_word" fisier.txt) -gt 0 ]]; then
    echo "Word was found in the file."
else
    echo "Word was not found, sorry."
fi
Iterate through files:
for file in $(ls *.txt); do
    echo "Processing txt file: $file"
done
[bash] [while-read] Read a file and assign a variable for each column
- while-read.sh
#!/bin/bash

IFS=$'\t'
while read name group final_grade test_grade practical_grade; do
    echo "$name --> $group --> $final_grade --> $test_grade --> $practical_grade"
done < students.txt
IFS - defines the separator, here tab (\t).
[bash] [while-read] Read a file and adjust values based on a condition
- while-read-cond.sh
#!/bin/bash

IFS=$'\t'
while read name group final_grade test_grade practical_grade; do
	if test "$final_grade" -gt 5; then
        	echo "$name --> $group --> Good job, final grade is $final_grade --> $test_grade --> $practical_grade"
    	fi
	echo "$name --> $group --> $final_grade --> $test_grade --> $practical_grade"
done < students.txt
[bash] [for] Script for manipulating all files from a folder (print information about them, make backups)
- manip.sh
#!/bin/bash

for file in "$1"/*
do
    if test -f "$file"; then
        stat -c "%a %F %n" "$file"
        cp "$file" "$file.bkp"
    fi
done
%a - file permission in numeric form.
%F - file type.
%n - complete file name.
[bash] [rm] Script that removes itself
- nothing.sh
#!/bin/bash

rm -- "$0"
– - end of command line options.
“$0” - the name of the script.
[bash] [for] Script to print the sum of the received arguments, error if no argument
- dumb-sum.sh
#!/bin/bash

nr_args=$#

if [ "$nr_args" -eq 0 ]; then
    echo "Error: No arguments provided. Usage: $0 <arg1> <arg2> ..."
    exit 1
fi

sum=0

for (( i=1; i<=$nr_args; i++ ))
do
	eval arg=\${$i}
	 sum=$((sum + arg))
done

echo "Sum is: $sum"
$((sum + arg)) is to evaluate arithmetic expression.
[bash] Advanced dictionary lookup script
Script to download the wbritish package (contains dictionaries) and which should validate the words from in.txt file located at in.txt with the words from the dictionary.
Example:
./lookup.sh in.txt
apple in dictionary
noapple not in dictionary
Lookup script with the in.txt file downloaded locally (using wget http://elf.cs.pub.ro/uso/res/final/146/in.txt)
- lookup.sh
#!/bin/bash

if [ "$#" -ne 1 ]; then
    echo "Usage: $0 <input_file>"
    exit 1
fi

input_file=$1

if ! dpkg -l | grep -qw wbritish; then
    echo "Installing wbritish package."
    sudo apt-get update && sudo apt-get install -y wbritish
fi

if [ ! -f "$input_file" ]; then
    echo "File does not exist: $input_file"
    exit 2
fi

while IFS= read -r word; do
    if look "$word" /usr/share/dict/british-english > /dev/null; then
        echo "$word in dictionary"
    else
        echo "$word not in dictionary"
    fi
done < "$input_file"
Output:
./lookup.sh in.txt
mine in dictionary
yours not in dictionary
apples in dictionary
notSoApples not in dictionary
Lookup script that will download the in.txt file from the remote location:
- lookup.sh
#!/bin/bash

if [ "$#" -ne 1 ]; then
    echo "usage: $0 <input_file>"
    exit 1
fi

input_file_url=$1
input_file="in.txt"

wget -O "$input_file" "$input_file_url" || { echo "Eroare downloading input file."; exit 2; }

if ! dpkg -l | grep -qw wbritish; then
    echo "wbritissh not installed, installing"
    sudo apt-get update && sudo apt-get install -y wbritish
fi

if [ ! -f "$input_file" ]; then
    echo "input file does not exist: $input_file"
    exit 2
fi

#read each word from input file and check if it is present in dictionary

while IFS= read -r word; do
    if look "$word" /usr/share/dict/british-english > /dev/null; then
        echo "$word in dictionary"
    else
        echo "$word not in dictionary"
    fi
done < "$input_file"
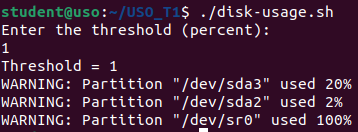
[bash] Advanced disk usage script
Create a script named disk-usage.sh that reads a number from stdin and displays the partition that has a disk usage percentage greater than that number.
If the input received is not a number, use a default threshold value chosen by you.
Usage example:
$ ./disk-usage.sh
Threshold = 12
WARNING: Partition "/dev/nvme0n1p6" used 13%
WARNING: Partition "/dev/nvme0n1p1" used 27%

$ ./disk-usage.sh
Threshold = ceva
WARNING: Partition "/dev/nvme0n1p6" used 30%
WARNING: Partition "/dev/nvme0n1p1" used 31%
- disk-usage.sh
#!/bin/bash

# User should input the threshold
echo "Enter the threshold (percent):"
read threshold

# Check if the threshold is a number
if ! [[ "$threshold" =~ ^[0-9]+$ ]]; then
    echo "Input is not a number, using default threshold: 20."
    threshold=20
else
    echo "Threshold = $threshold"
fi

df -h | awk -v threshold="$threshold" 'NR>1 {gsub(/%/,"",$5); if($5 > threshold) print "WARNING: Partition \""$1"\" used "$5"%"}'
[git] Configure initial settings
git config --global user.name "Joe Black"
git config --global user.email "joe.black@github.com"
git config --global init.defaultBranch main
[git] Create an empty local repository in the current directory
[git] Link a local repository with a github one
git remote add origin https://github.com/odefta/array-sorting-algorithms.git
The sync between the local repo and the remote (github) repo is made with pull (get) and push (put) commands.
[git] Check if the remote repo was configured correctly
[git] Get all branches and history from remote repo
[git] Get the current branch
[git] Verify log history
[git] Verify log history - show last commits only
Show only the last 4 commits:
git log -n 4
Show only the last 4 commits - more compact form:
git log -n 4 --oneline
[git] Add / commit a file on the current branch to the local repository
Create a file, and run git status:
echo "Hello World" > hello.txt
git status
We have an untracked file we can add it (in staging area - which is a pre-commit step):
git add hello.txt
Use . to add all files (from current dir - which includes sub-dirs).
Now we can commit the hello.txt to the local repo:
git commit -m "Add hello.txt with hello world"
m - add a comment
After modifying a file (hello.txt) we can issue again a commit.
[git] Push the commit to the remote repo
[git] Adding a new branch
[git] Switch to other branch
[git] Merge two branches
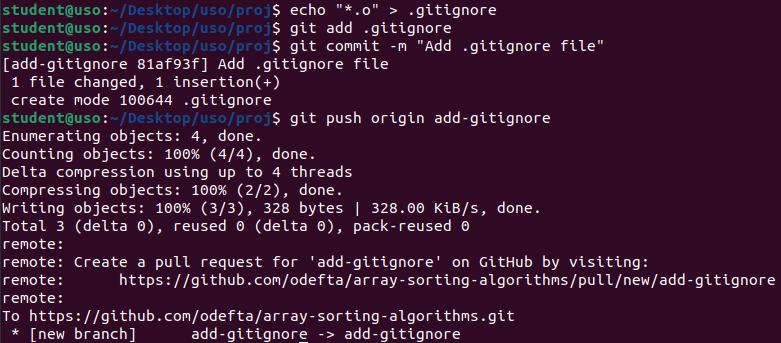
First, let's commit something to our current branch add-gitignore and sync with the remote:
echo "*.o" > .gitignore
git add .gitignore
git commit -m "Add .gitignore file"
git push origin add-gitignore
Now we want to merge our branch main with the add-gitignore branch (to get the .gitignore file).
First, switch to the main branch and get the changes from the remote:
git checkout main
git pull origin main
Now we are ready to merge our current branch main with add-gitignore:
git merge add-gitignore
Push the changes to the remote:
git push origin main
[git] Remove a branch both locally and remote
We want to delete our secondary branch add-gitignore.
First, we need to be on another branch (main).
git checkout main
Remove local branch.
git branch -d add-gitignore
Remove remote branch.
git push origin --delete add-gitignore
[git] Switch to a remote branch (without creating a local one with the same name)
Remote branch is test.
git fetch origin
git branch -r (verify available remote branches)
git checkout -t origin/test
[user] Check the current user
[user] Check another user
[user] Display all logged-in users
who
To display only the user name:
who | cut -d ' ' -f1
To display additional info:
w
To filter only the logged-in users:
w | awk 'FNR>2 {print $1}'
[user] Get only the UID for a certain user
This will print all info.
id syslog
This will print the first column.
id syslog | awk '{print $1}'
This will get the uid value after =.
id syslog | awk '{print $1}' | cut -d= -f2
Finally, this will get the actual uid value.
id syslog | awk '{print $1}' | cut -d= -f2 | cut -d'(' -f1
[user] Switch user
Switch to another user, you should know only your password. User should be present in sudoers file.
sudo su <user_name>
Switch to another user, you should know only your password.
sudo su - <user_name>
- will use the environment variables of that new user.
Switch to another user, you should know the password of the new user.
su <user_name>
Switch to another user, simulate initial login (-i).
sudo -u <user_name> -i
Start a new login session.
sudo login <user_name>
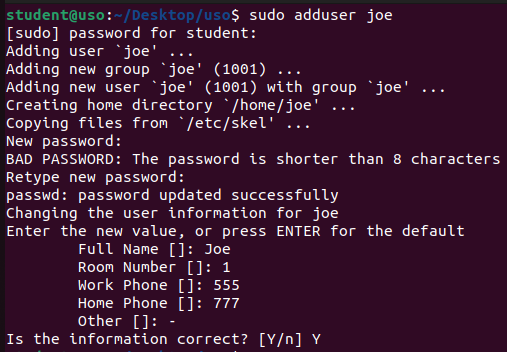
[user] Create a new user
Simplest and interactive way:
sudo adduser joe
We can add the existing user joe to the joegroup:
sudo adduser joe joegroup
Advanced, with more options (specify home directory, default shell, default group).
sudo groupadd joegroup
sudo useradd -m -d /home/joe -s /bin/bash -g joegroup joe
m - create home directory.
d - path to the home directory.
s - set implicit shell.
g - set primary group.
To add also secondary groups:
sudo groupadd joesecond
sudo groupadd joethird
sudo useradd -m -d /home/joe -s /bin/bash -g joegroup -G joesecond,joethird joe
G - secondary groups separated by comma.
Add / change the joe's password:
sudo passwd joe
[user] Modify an existing user
Add secondary groups to the user:
sudo groupadd joefourth
sudo groupadd joefive
sudo usermod -a -G joefourth,joefive joe
a - add (important!), without it, the user will be eliminated from the other secondary groups.
Modify the home directory:
sudo usermod -d /home/newjoe joe
d - dir name.
Change the joe's default shell (First, inspect the /etc/shells file for a list of all available shells)
sudo usermod -s /bin/sh joe
Same effect can be obtained with
sudo chsh -s /bin/sh joe
Modify the joe's primary group:
sudo usermod -g joesecond joe
[user] Remove an user
Remove joe, but keep its files.
sudo userdel joe
Remove joe with all its files (from home dir and other places).
sudo userdel -r joe
r - recursive
[user] Block an user to authenticate
sudo usermod -s /usr/sbin/nologin joe
[user] View user details
[user] Change mode
Owner read and write, group read, other no permission:
chmod 640 file.txt
chmod u=rw,g=r,o= file.txt
Add execute right for others:
chmod 641 file.txt
chmod o+x file.txt
Eliminare read permission for group:
chmod 601 file.txt
chmod g-r file.txt
Eliminare write permission for all:
chmod ugo-w file.txt
[user] Change owner
Change the owner to joe user and joegroup group.
sudo chown joe:joegroup file.txt
Change only the owner (let the group intact).
sudo chown joe file.txt
Change the owner of all files in a directory (recursive) - let the group intact.
sudo chown -R joe dir
Change the owner of all files in a directory (recursive) - change also the group.
sudo chown -R joe:joegroup dir
[user] Just two users should have right to modify files from a folder
Suppose those 2 users are uso and so. Folder path is /uso.
sudo groupadd usogroup
sudo usermod -aG usogroup uso
sudo usermod -aG usogroup so
sudo chgrp -R usogroup /uso
sudo chmod -R 770 /uso
[user] Generate passwords
Generate 5 password of length 10, one per line, each containing at least one uppercase letter.
for i in {1..5}; do
    echo $(openssl rand -base64 9 | tr -dc 'a-zA-Z0-9' | cut -c 1-9)$(tr -dc 'A-Z' < /dev/urandom | head -c 1)
done
Same thing using pwgen tool.
sudo apt install pwgen
pwgen -c -n -B 10 5 | tr ' ' '\n'
c (–capitalize) - at least one capital letter will be included.
n (–numerals) - at least one number will be included.
B (–ambiguous) - eliminate ambiguous characters (like 0 and O).
10 - length of the password.
5 - generate 5 password.
[sec] [base64] Encoding / decoding a string using base64
Encoding.
echo -n "Base64 is not encryption!" | base64
QmFzZTY0IGlzIG5vdCBlbmNyeXB0aW9uIQ==
Decoding.
echo -n "QmFzZTY0IGlzIG5vdCBlbmNyeXB0aW9uIQ==" | base64 -d
d - decoding
Base64 is not encryption!
[sec] [base64] Encoding / decoding an entire file using base64
Encoding.
base64 file.txt > file64.txt
Decoding.
base64 -d file64.txt > file_dec.txt
[sec] [openssl] Encrypting / decrypting a file using OpenSSL
Encrypt the file file.txt to file file.enc
echo -n "plaintext content" > file.txt
openssl aes-256-cbc -in file.txt -out file.enc -pass pass:"my secret" -pbkdf2 -iter 10000
aes-256-cbc - encrypt the file using AES-256 in CBC mode
in - input file (plain text)
out - output file (encrypted)
pass - sets the passphrase (will be used for decryption)
pbkdf2 - selects PBKDF2 for key derivation, enhancing security against brute-force attacks
iter 10000 - sets the number of iterations in the key derivation, increasing the difficulty of cracking the encryption.
Decrypt the file file.enc to decrypted_file.txt.
openssl aes-256-cbc -d -in file.enc -out decrypted_file.txt -pass pass:"my secret" -pbkdf2 -iter 10000
d - decrypt
[sec] [hash] Hash a string
Using md5 (less secure) - two ways of achieving the same result.
echo -n "plaintext content" | md5sum
f88d6c9eab9c6a2ef3cfd3c59832b4d6 -
echo -n "plaintext content" | openssl dgst -md5
MD5(stdin)= f88d6c9eab9c6a2ef3cfd3c59832b4d6
Using SHA256 (much more secure - less collision issues).
echo -n "plaintext content" | openssl dgst -sha256
SHA2-256(stdin)= d800efe86c80b6054cff4850f3044d73e979429809f28029e26cd9c4f6d6cea8
[sec] [hash] Hash an entire file
file.txt content: plaintext content
Using md5.
md5sum file.txt
88d6c9eab9c6a2ef3cfd3c59832b4d6 file.txt
Using SHA256.
sha256sum file.txt
d800efe86c80b6054cff4850f3044d73e979429809f28029e26cd9c4f6d6cea8 file.txt
[sec] [password cracking] Crack linux users passwords using John The Ripper
Install John The Ripper tool.
sudo apt install john
Merge the Linux system files /etc/passwd and /etc/shadow to create a single file (mypasswd.txt) containing user accounts and their hashed passwords.
sudo unshadow /etc/passwd /etc/shadow > mypasswd.txt
Create a word list used to guess the password.
echo -ne "school\nuniversity\nstudent" > wordlist.txt
n - avoid printing the newline
e - interpret backslash escapes.
Now we are ready to run John The Ripper.
john --wordlist=wordlist.txt mypasswd.txt
Finally, crack the passwords:
john --format=crypt mypasswd.txt
View the actual passwords (right after username):
john --format=crypt mypasswd.txt --show
[sec] [password cracking] Crack a zip archive password using John The Ripper
hashfile contains extracted password hashes.
This will use the default dictionary (word list) file.
john --format=zip hashfile
To use a custom dictionary file:
john --format=zip hashfile --wordlist=path/to/your/wordlist.txt
[sec] [password cracking] Crack a zip archive password using fcrackzip
Install the fcrackzip tool.
sudo apt install fcrackzip
Brute-force guessing the password. We know it has 4 characters.
fcrackzip -v -l 1-4 -u secret_brute_force.zip
v - verbose
l 1-4 - pwd length from 1 to 4
u - extract the zip archive when the password is found.
Use a dictionary to crack the password.
fcrackzip -u -D -p wordlist.txt secret.zip
u - extract the zip archive when the password is found.
D - enables dictionary mode.
p - path to the dictionary file.
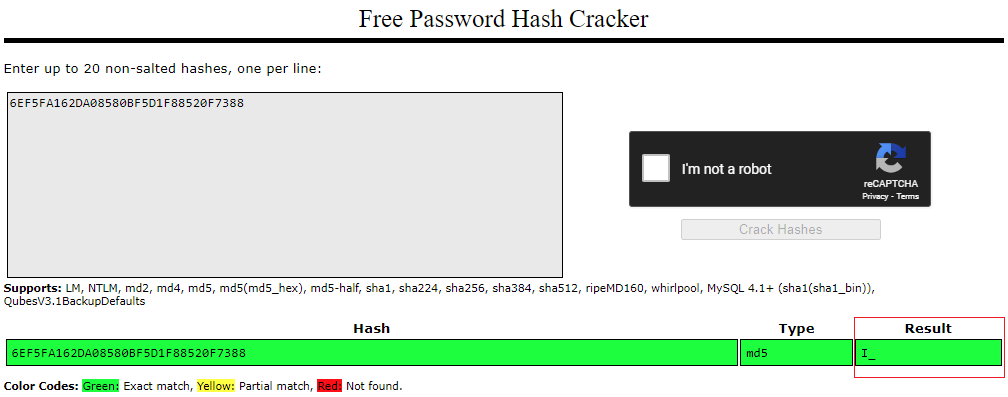
[sec] [hash cracking] Find a hidden message from a file with hashes (one per line)
Suppose we have my-hashes.txt:
F5D6C6C424929713C297514199F7CA41
AAD24C09BF816BBC6EA29C35DF52F896
F95B70FDC3088560732A5AC135644506
6EF5FA162DA08580BF5D1F88520F7388
CBB184DD8E05C9709E5DCAEDAA0495CF
1BC29B36F623BA82AAF6724FD3B16718
We'll take each line, put it in crackstation.net
The decrypted info from each line will form the final message.


